Spring学习笔记
Last Update:
Spring学习笔记
源代码托管在GitHub上
简介
Spring 是一个轻量级的控制反转(IOC)和面向切面(AOP)的框架
- 开源的、免费的
- 轻量级的、非入侵式的
- 控制反转、面向切面编程
- 支持事务处理
组成

核心容器(Spring Core)
核心容器提供Spring框架的基本功能。Spring以bean的方式组织和管理Java应用中的各个组件及其关系。Spring使用BeanFactory来产生和管理Bean,它是工厂模式的实现。BeanFactory使用控制反转(IoC)模式将应用的配置和依赖性规范与实际的应用程序代码分开。
应用上下文(Spring Context)
Spring上下文是一个配置文件,向Spring框架提供上下文信息。Spring上下文包括企业服务,如JNDI、EJB、电子邮件、国际化、校验和调度功能。
Spring面向切面编程(Spring AOP)
通过配置管理特性,Spring AOP 模块直接将面向方面的编程功能集成到了 Spring框架中。所以,可以很容易地使 Spring框架管理的任何对象支持 AOP。Spring AOP 模块为基于 Spring 的应用程序中的对象提供了事务管理服务。通过使用 Spring AOP,不用依赖 EJB 组件,就可以将声明性事务管理集成到应用程序中。
JDBC和DAO模块(Spring DAO)
JDBC、DAO的抽象层提供了有意义的异常层次结构,可用该结构来管理异常处理,和不同数据库供应商所抛出的错误信息。异常层次结构简化了错误处理,并且极大的降低了需要编写的代码数量,比如打开和关闭链接。
对象实体映射(Spring ORM)
Spring框架插入了若干个ORM框架,从而提供了ORM对象的关系工具,其中包括了Hibernate、JDO和 IBatis SQL Map等,所有这些都遵从Spring的通用事物和DAO异常层次结构。
Web模块(Spring Web)
Web上下文模块建立在应用程序上下文模块之上,为基于web的应用程序提供了上下文。所以Spring框架支持与Struts集成,web模块还简化了处理多部分请求以及将请求参数绑定到域对象的工作。
MVC模块(Spring Web MVC)
MVC框架是一个全功能的构建Web应用程序的MVC实现。通过策略接口,MVC框架变成为高度可配置的。MVC容纳了大量视图技术,其中包括JSP、POI等,模型来有JavaBean来构成,存放于m当中,而视图是一个街口,负责实现模型,控制器表示逻辑代码,由c的事情。Spring框架的功能可以用在任何J2EE服务器当中,大多数功能也适用于不受管理的环境。Spring的核心要点就是支持不绑定到特定J2EE服务的可重用业务和数据的访问的对象,毫无疑问这样的对象可以在不同的J2EE环境,独立应用程序和测试环境之间重用。
拓展
现代化的Java开发,就是基于Spring开发~
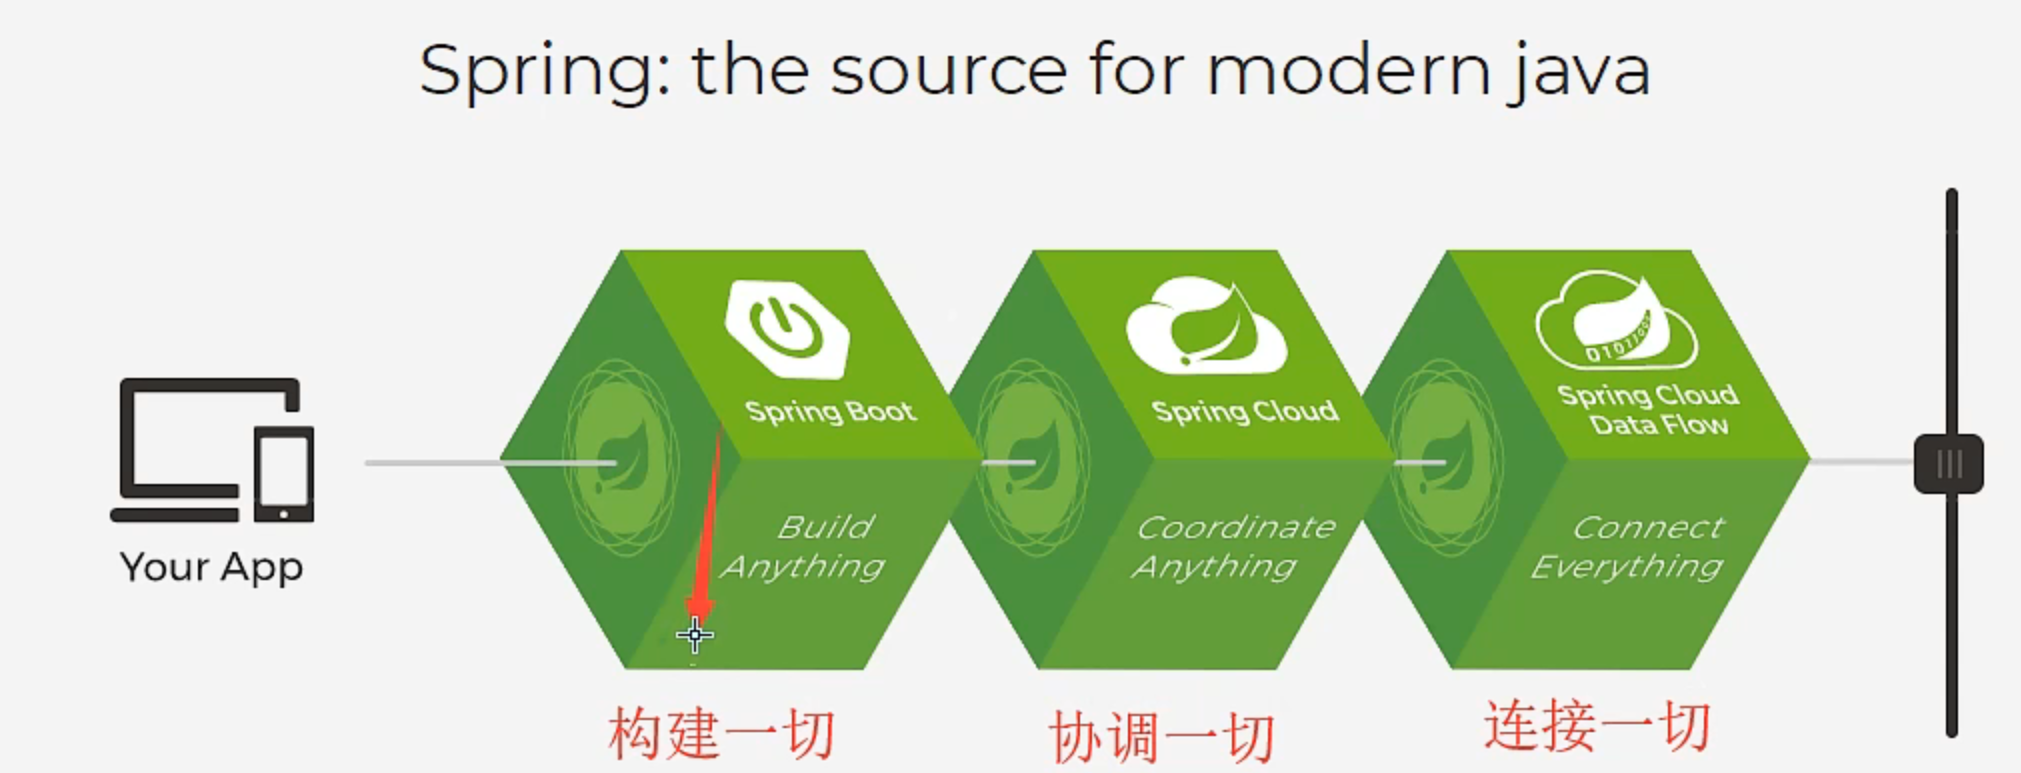
- Spring Boot
- 一个快速开发的脚手架
- 基于SpringBoot可以快速开发单个微服务
- 约定大于配置
- Spring Cloud
- 基于SpringBoot实现
弊端:配置繁琐,“配置地狱”
IOC理论推导
共同的部分:Dao+多个DaoImpl,Service+多个ServiceImpl
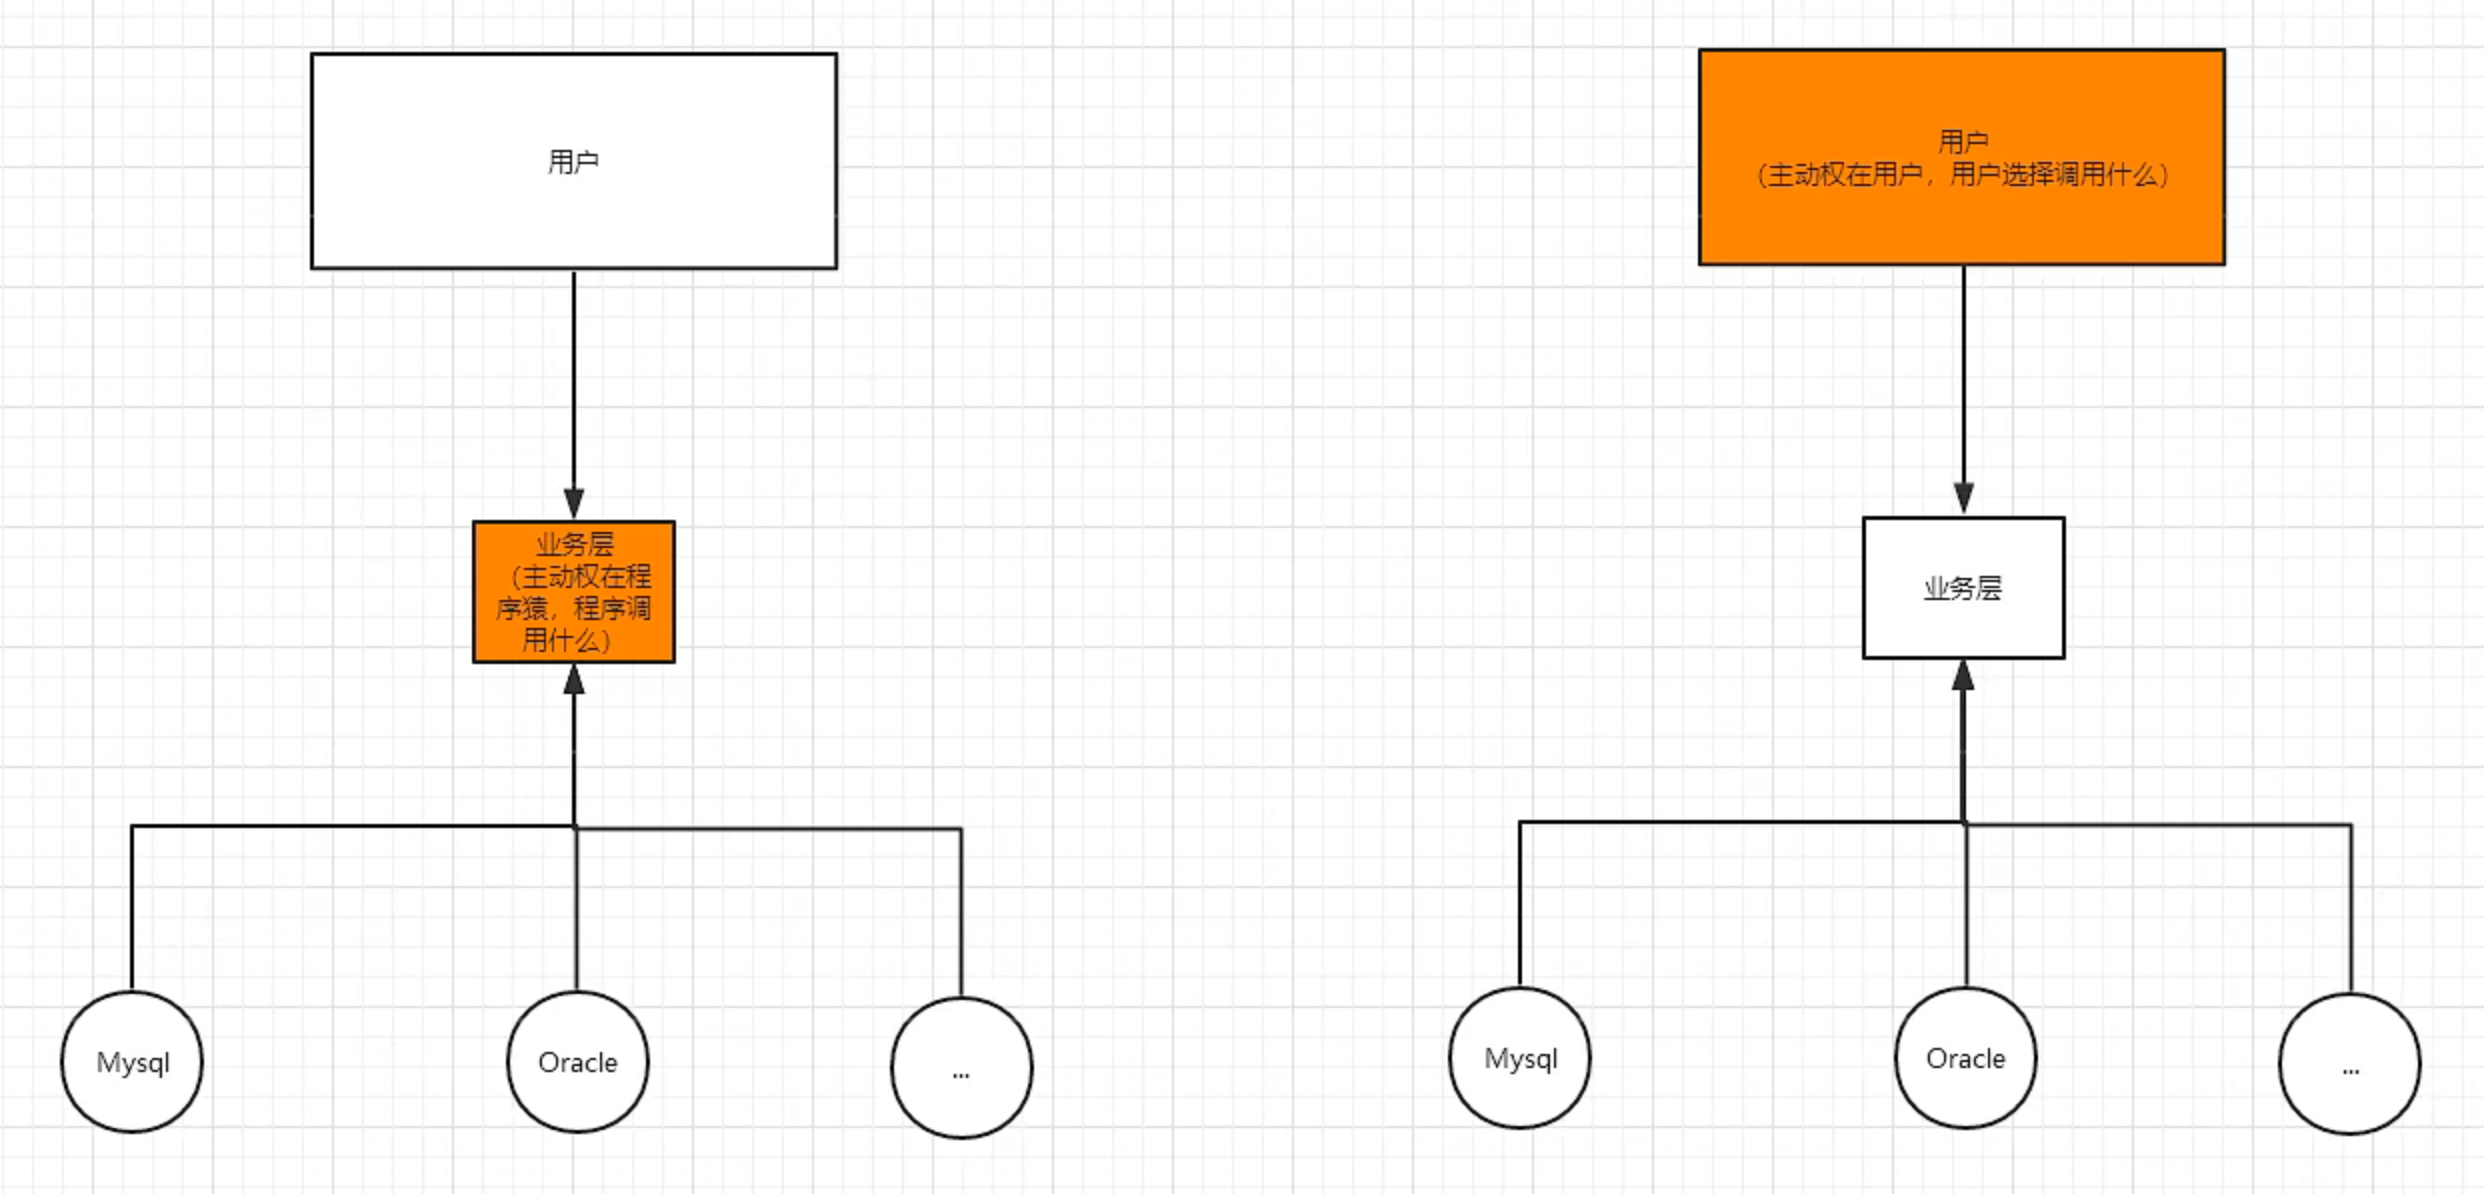
原本的方式:Service靠程序创建实例(主动性在程序员身上)
1 | |
- 成本高,每一次都需要手动修改源代码
- 需求不能做到动态变化

IOC的方式:Service靠set注入,由用户来创建实例(主动性在用户身上)
1 | |
IOC的本质
总结来说就是依赖对象的生成方式反转,主动权来到用户手上

DI(依赖注入)只是IOC(控制反转)的一种实现方式
Spring中实例来自于配置或者注解
HelloSpring
使用Spring容器创建管理输出实例,具体步骤:
- 保证原型的属性具有getter、setter
- 编写配置文件或者注解(配置文件的写法:Container Overview :: Spring Framework)
- 使用ClassPathXmlApplicationContext获取Java实例(其他的Bean有其相应的获取方法,比如注解对应的AnnotationConfigApplicationContext,文件对应的Filexxx)
1 | |
1 | |
1 | |
IOC创建对象的方式
1、 通过无参构造的方式
2、 通过有参构造的方式
1、 通过index
2、 通过类型,但是有相同的时候不适用
3、 通过参数名字
1 | |
IOC何时创建对象
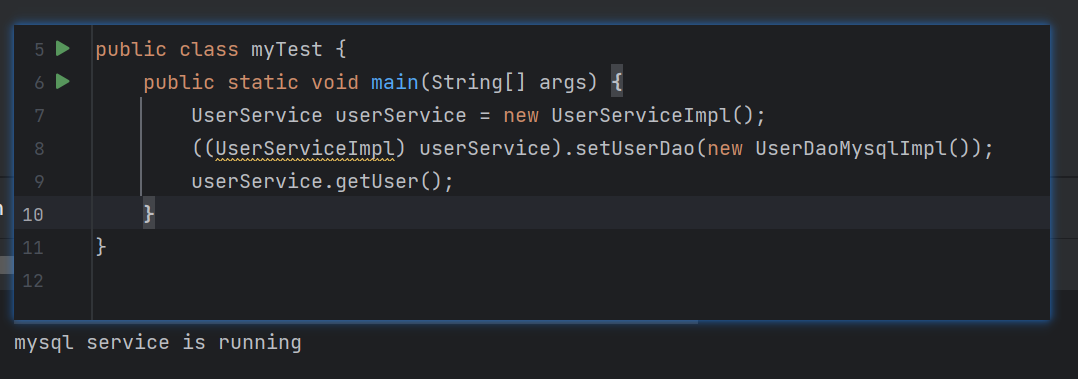
在导入配置文件的时候就已经创建了对象,何以见得呢
可以从配置文件中配置了但是没有get出来的UserT对象得出
1 | |
另外:多个getBean也得到的同一个对象
Spring配置
别名
alias起别名其实很简单,name->alias
1 | |
bean
bean的id就是bean实例的唯一标识,class为bean对应的原型类(包名+类型),name也是别名且可以同时取多个别名
1 | |
import
用于团队,可以导入多个配置文件,使用的时候可以使用导入的app就行
applicationContext.xml+beans1.xml+beans2.xml+beans3.xml
1 | |
依赖注入(DI)
首先理解依赖注入,依赖指的是配置好容器创建对象时候的必要参数(如有参构造等),注入指的就是容器创建对象的时候将这些必要的参数赋予实例。可以参考[官方的解释](Dependency Injection :: Spring Framework):
Dependency injection (DI) is a process whereby objects define their dependencies (that is, the other objects with which they work) only through constructor arguments, arguments to a factory method, or properties that are set on the object instance after it is constructed or returned from a factory method. The container then injects those dependencies when it creates the bean.
通过Student类进行一系列简单、Bean、复杂类型(所有的类型包括:bean | ref | idref | list | set | map | props | value | null)的注入方式进行演示
setter注入
1 | |
idref是什么?
一开始我以为是把对象引用的形式作为参数传入,后面一直报错:Property of 're.zepo.pojo.Address' type cannot be injected by 'String',我就纳闷了,我格式也没写错呀。。。原来人家传的是Bean的id,是bean的id名称不是bean对象实例!!!!我猜测应该是可以在Bean出现别名的时候寻找真实Bean的id吧
拓展注入
引入p命名空间(Dependencies and Configuration in Detail :: Spring Framework):
1 | |
引入c命名空间(Dependencies and Configuration in Detail :: Spring Framework):
1 | |
bean的作用域
| Scope | Description |
|---|---|
| singleton | (Default) Scopes a single bean definition to a single object instance for each Spring IoC container. |
| prototype | Scopes a single bean definition to any number of object instances. |
| request | Scopes a single bean definition to the lifecycle of a single HTTP request. That is, each HTTP request has its own instance of a bean created off the back of a single bean definition. Only valid in the context of a web-aware Spring ApplicationContext. |
| session | Scopes a single bean definition to the lifecycle of an HTTP Session. Only valid in the context of a web-aware Spring ApplicationContext. |
| application | Scopes a single bean definition to the lifecycle of a ServletContext. Only valid in the context of a web-aware Spring ApplicationContext. |
| websocket | Scopes a single bean definition to the lifecycle of a WebSocket. Only valid in the context of a web-aware Spring ApplicationContext. |
单例模式(默认)
1 | |
原型模式,每次getBean都是新对象
1 | |
Bean的自动装配
- 自动装配是Spring满足bean依赖的一种方式
- Spring会在上下文自动寻找并自动给bean装配属性
在Spring有三种装配方式:
- 在xml中显示配置【前面的例子】
- java中显式配置【后面会提】
- 隐式配置中的自动装配【此处演示】
隐式配置有两种方式,一种是通过名字,通过匹配参数名字与beanId,需要保证beanId唯一;另一种通过类型,需要保证需要注入的属性类型对应的bean唯一
1 | |
使用注解实现自动装配
注解在JAVA1.5,Spring2.5就开始支持了
前提
- 配置文件需要加入注解约束
http://www.springframework.org/schema/context http://www.springframework.org/schema/context/spring-context.xsd、xmlns:context="http://www.springframework.org/schema/context"
- 配置文件需要加入注解支持
<context:annotation-config/>
@Autowired
参考文章【Spring注解装配:@Autowired和@Resource使用及原理详解 - 知乎 (zhihu.com)】、文档【Using @Autowired :: Spring Framework】
- 直接在属性上使用,需要已经在xml中存在该类型的bean
- 在setter、constructor方法上使用,因为通过反射实现setter可以省略了
- 可以@Autowired(required=false)来允许属性为空
- 当有多个类型的bean的时候
- 如果有配合@Qualifier使用,会按照这个名字指定byName
- 如果没有,则按照变量名进行匹配,
查找name为xxx的bean
弹幕提示:Autowire优先按类型,找不到就报错,找到多个则按名字,Qualifier则是在有多个类型的情况下按名字
@Nullable
表示字段可以为空
1 | |
@Resource
jdk11之后需要手动配置依赖导包,@Resource默认按byName自动注入,也提供按照byType 注入
当需要指定名字的时候,可以@Resource(name="bc")
使用注解进行开发
前提准备
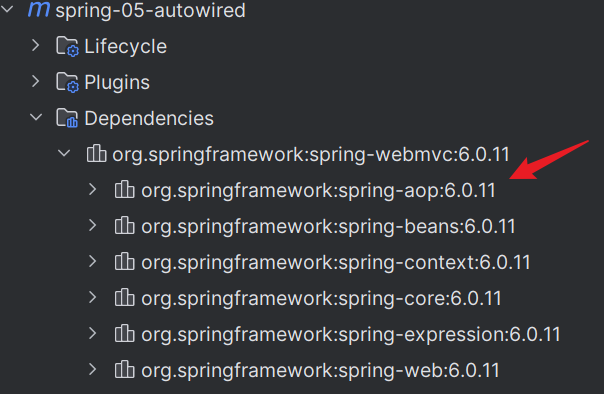
在spring4以后要使用注解开发,要检查aop是否导入
前面注解需要增加注解的支持可以换成指定包下的组件扫描(这个包下的注解支持自然就开启了)
1 | |
bean
@Component,放在类上,说明该类受Spring管理,容器也会创建Bean,相当于
<bean />类名的小写会默认视为bean的id
属性如何注入
@Value,相当于<property>或者constructor-arg
衍生的注解
@Component有几个衍生注解,比如web开发中分层架构中对应的三个:
- dao:@Repository
- service:@Service
- controller:@Controller
自动装配
@Autowired,查找现有bean进行注入
作用域
回忆在配置文件中是配置在bean字段中的,所以同样的@Scope要配在@Component附近,表示该bean受spring管理,然后注明存在的地方
小结
1 | |
xml比较万能,使用所有场合,为何方便
注解 不是自己类使用不了,维护复杂
xml与注解一起的最佳实践
- xml用来管理bean
- 注解只负责完成属性的注入
JavaConfig
完全使用注解的方式使用spring,全权交给Java来做
@Configuration相当于
<beans />,在<beans />中可以有bean,这里的bean来自于注解下方方法的返回,相当于<bean />使用配置类进行spring的配置的时候,要搭配
AnnotationConfigApplicationContext进行获取上下文对象1
2ApplicationContext context = new AnnotationConfigApplicationContext(ZeporeConfig.class);
User user = context.getBean("user", User.class);【全注解】
@ComponentScan + @Component等价于@Configuration + @Bean(【注解加xml】<context:component-scan base-package="xxx"/> + @Component等价于<beans><bean/></beans>)@Import注解用于导入其他的配置类
@Bean跟@Component的区别
参考文章:Spring @bean 和 @component 注解有什么区别? - 掘金 (juejin.cn)
- 作用对象不同:
@Component注解作用于类,而@Bean注解作用于方法 @Component通常是通过路径扫描来自动侦测以及自动装配到 Spring 容器中(我们可以使用@ComponentScan注解定义要扫描的路径从中找出标识了需要装配的类自动装配到 Spring 的 bean 容器中)。@Bean注解通常是我们在标有该注解的方法中定义产生这个 bean,@Bean告诉了 Spring 这是某个类的实例,当我们需要用它的时候还给我。@Bean注解比@Component注解的自定义性更强,而且很多地方我们只能通过@Bean注解来注册 bean。
比如当我们引用第三方库中的类需要装配到 Spring 容器时,只能通过@Bean来实现。(最重要的一点!)
@Primary+@Bean
@Primary用在有多个同类型Bean的时候,赋予@Atuwired的优先权
@Configuration + @Bean
@Configuration等价于<beans/>,@Bean等价于<bean/>
Using the @Bean Annotation :: Spring Framework;
@ComponentScan + @Component
@ComponentScan等价于<context:component-scan base-package="xxx"/>,@Component就依然是@Component
总结
先浅浅这样理解吧,在官网看到逆天的操作,但仔细思考了很久,我就觉得是因为**@Configuration本身就是@Component、@Bean和@Component近乎同样处于低层**的缘故,但考虑到太绕,不继续深究,按照前面的理解就行,后面回来考古吧(链接:Classpath Scanning and Managed Components :: Spring Framework),附上一篇拓展的官方Java配置注解开发文档【Composing Java-based Configurations :: Spring Framework】
静态代理
代理类的要求:需要能做租客的功能,在租客功能的基础上增强,相当于套了一层,而真实业务以组合的形式由代理来决定调用(实现原业务类的实现接口 + 组合上原业务)
我的理解代理就是要能跟真实角色能做一样的内容(实现),同时对真实角色的方法做增强(组合)
房子租赁接口
1 | |
房东实体
1 | |
开发商实体
1 | |
中介
1 | |
测试样例
1 | |
强制代理
强制代理中,可以从要实现的结果倒推类的写法,我们需要实现一种结果:客户找房东必须通过中介,没有的话会有提示。也就说明房东类中需要判断调用者是否为中介。
房子租赁接口
1 | |
房东类
1 | |
中介类
1 | |
客户租房测试
1 | |
动态代理
- 动态代理的代理是动态生成的,不是直接写好的
- 动态代理分两大类:基于接口的动态代理、基于类的动态代理
- 基于接口——jdk动态代理
- 基于类——cglib
- java字节码实现
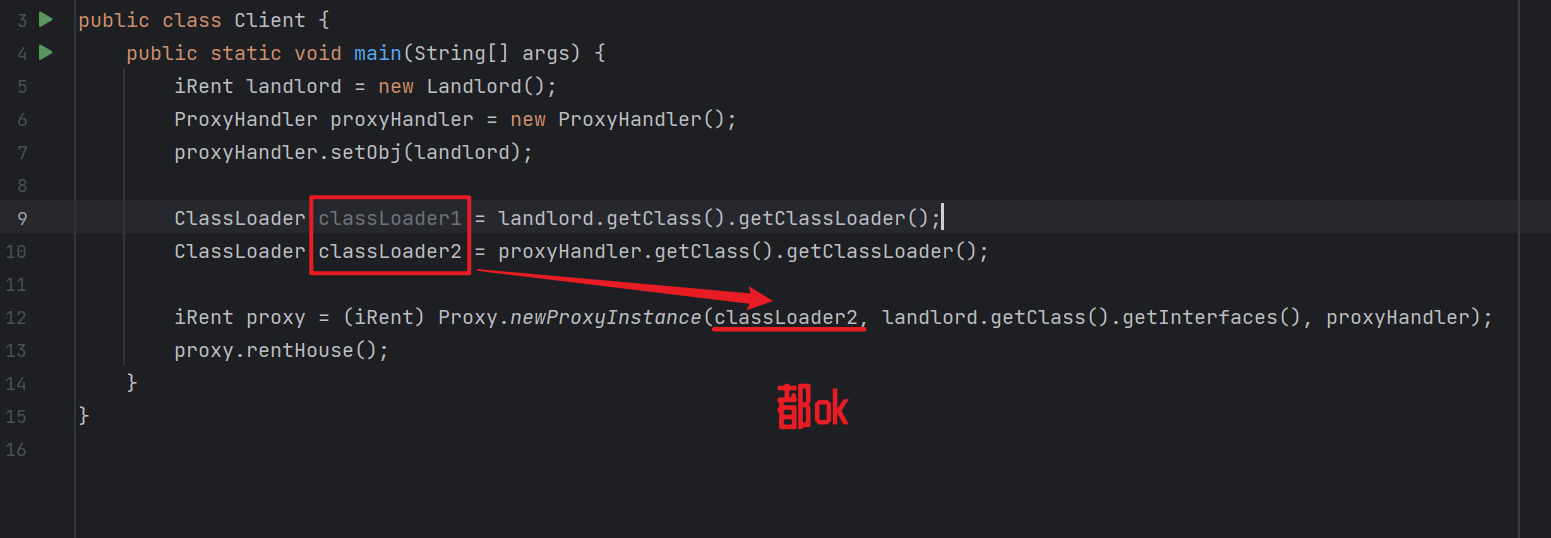
动态代理主要通过Proxy.newProxyInstance实现,而其需要的三个参数分别是ClassLoader loader 、Class<?>[] interfaces、InvocationHandler h,代表了类加载器(InvocationHandler对象/被代理对象 的 classLoader)、被代理对象的实现接口(new Class[]{被代理对象的接口1.class, 被代理对象的接口1.class} / 被代理对象.getClass().getInterfaces())、自己重写的InvocationHandler实例
在使用代理模式时,需要谨慎选择类加载器,以确保代理类和被代理类能够正确加载并且能够相互访问,要保证代理对象和被代理对象在同一个类加载器中加载,ClassLoader可以是InvocationHandler对象的,也可以是被代理对象的。
在实践中,可以将创建代理的过程一并写进InvocationHandler中,提供一个方法直接返回一个代理,这样在用户测试类中简洁很多,并且代理利用率高;也可以单纯重写InvocationHandler的invoke方法,这样做有助于加深理解
演示两种方式:
房屋租赁类
1 | |
房东类
1 | |
直接返回代理
ProxyInvocationHandler类
1 | |
用户测试类
1 | |
仅做好invoke的重写
ProxyInvocationHandler类
1 | |
用户测试类
1 | |
代理优缺点
代理模式的介绍:设计模式(四)——搞懂什么是代理模式 - 知乎 (zhihu.com)
好处
- 可以是真实角色的操作更加纯粹!不同关注公共业务
- 实现业务的分工,代理角色处理琐事
- 公共业务发生拓展的时候方便集中管理
缺点
- 静态代理一个真实角色就会产生一个代理角色;
- 代码量翻倍
- 开发效率降低
AOP实现
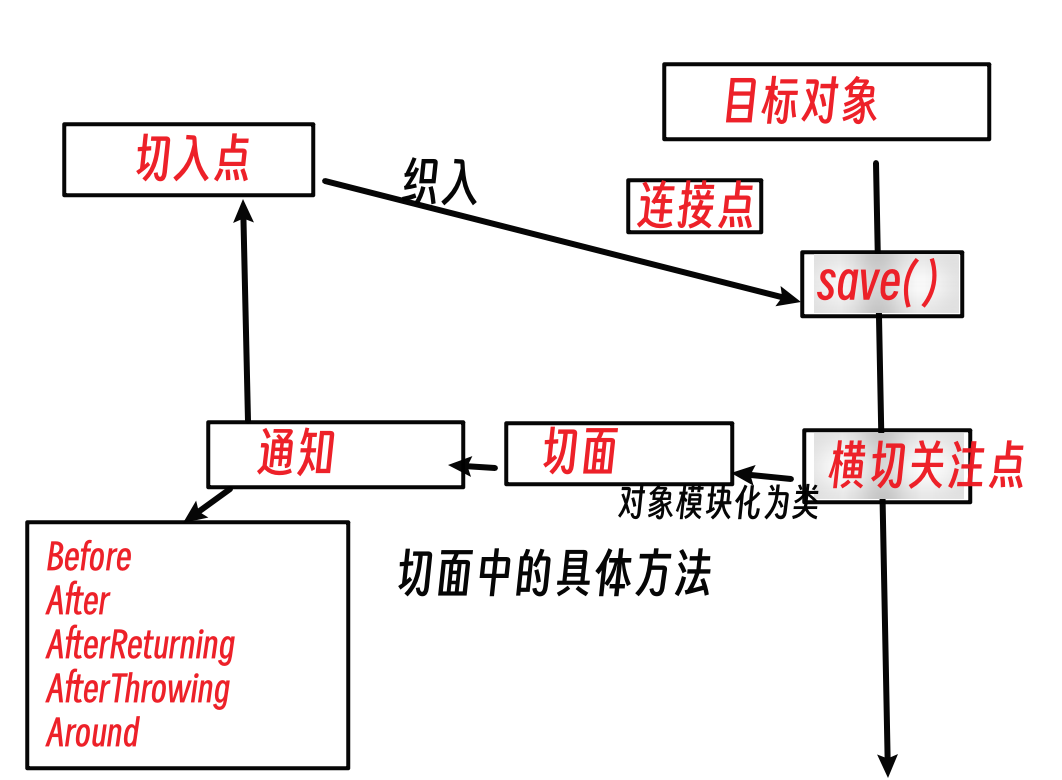
AOP中的名词
- 切面(Aspect):一个关注点的模块化。以注解@Aspect的形式放在类上方,声明一个切面。自定义的增强类,也就是动态代理中的代理对象
- 连接点(Joinpoint):在程序执行过程中某个特定的点,比如某方法调用的时候或者处理异常的时候都可以是连接点。被代理类所有的方法
- 切点(Pointcut):其实就是筛选出的连接点,匹配连接点的断言,一个类中的所有方法都是连接点,但又不全需要,会筛选出某些作为连接点做为切点。如果说通知定义了切面的动作或者执行时机的话,切点则定义了执行的地点。切入点表达式如何和连接点匹配是AOP的核心:Spring缺省使用AspectJ切入点语法。被代理类接受了增强之后的方法,加了增强
- 通知(Advice):通知增强,需要完成的工作叫做通知,就是你写的业务逻辑中需要比如事务、日志等先定义好,然后需要的地方再去用。 主要包括5个注解:Before,After,AfterReturning,AfterThrowing,Around。 @Before:在切点方法之前执行。 @After:在切点方法之后执行 @AfterReturning:切点方法返回后执行 @AfterThrowing:切点方法抛异常执行 @Around:属于环绕增强,能控制切点执行前,执行后,用这个注解后,程序抛异常,会影响@AfterThrowing这个注解自定义的增强类中的方法,也就是横向的增强
其中重要的名词有:切面(Aspect),切点(Pointcut)
1 | |
实现方式一:通过实现通知接口方式
【配置 实现式切入点+增强方式(前后通知在接口实现的时候就已经确定)】
注意:在拿bean的时候需要用接口
- 引入依赖
1 | |
- 实现环绕类
在Spring中的AOP有6种增强方式,分别是:
前置增强 (org.springframework.aop.MethodBeforeAdvice) 表示在目标方法执行前来实施增强
后置增强(org.springframework.aop.AfterAdvice)表示在目标方法执行后返回前来实施增强,这个没能用上
# 会报这个错误 Exception in thread "main" org.springframework.aop.framework.adapter.UnknownAdviceTypeException: Advice object [log.LogAfter@5ba3f27a] is neither a supported subinterface of [org.aopalliance.aop.Advice] nor an [org.springframework.aop.Advisor]1
2
3
4
5
6
7
8
9
10
11
12
13
14
15
16
17
18
19
20
21
22
23
24
25
26
27
28
- 环绕增强 (org.aopalliance.intercept.MethodInterceptor) 表示在目标方法执行前后同时实施增强
- 最终增强 (org.springframework.aop.AfterReturningAdvice) 表示在目标方法执行并返回后来实施增强
- 异常抛出增强 (org.springframework.aop.ThrowsAdvice) 表示在目标方法抛出异常后来实施增强
- 引介增强 (org.springframework.aop.introductioninterceptor) 表示在目标类中添加一些新的方法和属性
3. 注册aop命名空间
- `xmlns:aop="http://www.springframework.org/schema/aop"`
- `xsi:schemaLocation="http://www.springframework.org/schema/aop http://www.springframework.org/schema/aop/spring-aop.xsd"`
4. 配置 切入点+增强方式
关于pointcut的表达式写法:[spring aop中pointcut表达式完整版 - 知乎 (zhihu.com)](https://zhuanlan.zhihu.com/p/63001123)
```xml
<aop:config>
<aop:pointcut id="pt" expression="execution(* 类名.*(..))" />
<!-- pointcut-ref -->
<aop:advisor advice-ref="" pointcut-ref="pt" />
<!-- 非pointcut-ref -->
<aop:advisor advice-ref="" pointcut="execution(* 类名.*(..))"/>
</aop:config>
实现方式二:在配置文件引入自定义切面
【切面+增强方法(前后通知在配置文件中的切面进行配置)】
注意:在拿bean的时候需要用接口
缺点是拿不到被代理的参数
- 引入依赖
1 | |
- 自定义切面类
1 | |
- 配置切面以及增强通知
1 | |
实现方式三:注解引入自定义切面
【注解实现+由spring接管bean+开启切面通知支持】
注意:<aop:aspectj-autoproxy>
在<aop:aspectj-autoproxy>的 proxy-target-class属性:JDK(默认 proxy-target-class=”false”) cglib (proxy-target-class=”true”)
区别是jdk只能代理接口实现类,而cglib可以代理没有实现接口的类
- 引入依赖
1 | |
- 注解实现自定义切面类
※ 环绕的注解使用
1 | |
- 注册bean并开启注解支持
1 | |
一份参考输出:
1 | |
AOP常见问题
切入点实例无法构建
报错:Exception in thread “main” org.springframework.beans.factory.BeanCreationException: Error creating bean with name ‘shopper’ defined in class path resource [ApplicationXMLContext.xml]: BeanPostProcessor before instantiation of bean failed
解决:这个一般来说是因为代理类的依赖没有引入
getBean的时候类型错误
- 报错:Exception in thread “main” org.springframework.beans.factory.BeanNotOfRequiredTypeException: Bean named ‘us1’ is expected to be of type ‘service.UserServiceImpl’ but was actually of type ‘jdk.proxy2.$Proxy3’
- 解决:这个是因为一般默认地使用jdk中的代理方式;如果使用注解开发可以选择代理的方式
未知的通知
- 报错:Exception in thread “main” org.springframework.aop.framework.adapter.UnknownAdviceTypeException: Advice object [log.LogAfter@5ba3f27a] is neither a supported subinterface of [org.aopalliance.aop.Advice] nor an [org.springframework.aop.Advisor]
- 解决:像
AfterAdvice这样的接口,没有可重写的,就表明不能用于直接在配置文件中声明通知,常见的第一种方式(实现接口的方式)可用的接口有:MethodBeforeAdvice、AfterReturningAdvice、ThrowsAdvice、MethodInterceptor
整合MyBatis
回顾MyBatis
- 配置依赖:mybatis、junit、jdbc、spring-mvc、spring-aop、mybatis-spring
1 | |
- 配置实体类/DAO
1 | |
- Mapper接口
1 | |
- Mapper xml
1 | |
- 配置数据库环境相关文件,记得加上mapper
1 | |
- 加入xml文件扫描支持
1 | |
- 测试类中的步骤
1 | |
常见出错
找不到xml文件
- 报错:Invalid bound statement (not found): mapper.UserMapper.selectByName
- 解决:pom.xml中加入以下内容
1 | |
没有注册mapper
- 报错:Exception in thread “main” org.apache.ibatis.binding.BindingException: Type interface mapper.UserMapper is not known to the MapperRegistry.
- 解决:在mybatis配置文件中注册mapper
1 | |
驱动找不到
- 报错:Loading class
com.mysql.jdbc.Driver. This is deprecated. The new driver class iscom.mysql.cj.jdbc.Driver. The driver is automatically registered via the SPI and manual loading of the driver class is generally unnecessary. - 解决:mybatis配置文件中修改一下
1 | |
整合mybatis方法一

原理上是改装test类,把数据源和SqlSessionFactory改到spring配置文件中,把sqlSession的操作改到接口实现类中
- 引入依赖spring-jdbc(而不是单纯的jdbc)
1 | |
- 在spring配置文件中配置mybatis的DataSource,也就是原本mybatis配置文件中的那部分
1 | |
配置SqlSessionFactory(绑定数据源和mybatis位置等在mybatis配置文件的信息)
- 数据源:`dataSource `<-- `<environments/>` - mybatis位置:`configLocation` <-- `Resources.getResourceAsStream()`中的位置参数 - mapper位置:`mapperLocations` <-- `<mappers/>` - 别名配置:`typeAliasesPackage` <-- `<typeAliases/>`1
2
3
4
5
6<bean id="sqlSessionFactory" class="org.mybatis.spring.SqlSessionFactoryBean">
<property name="dataSource" ref="dataSource" />
<property name="configLocation" value="classpath:mybatis-config.xml"/>
<property name="mapperLocations" value="classpath:mapper/*.xml"/>
<property name="typeAliasesPackage" value="po"/>
</bean>配置SqlSessionTemplate(等同于SqlSession)
1 | |
- 检查xml文件是否并且已经接受扫描,实现Mapper接口,记得使用组合形式方便注入SqlSession
xml规定了sql怎么写(对应的id),而Impl规定了何时执行sql
1 | |
- 测试类
1 | |
整合mybatis方法二

引入依赖
1
2
3
4
5
6
7
8
9
10
11
12
13
14
15
16
17
18
19
20
21
22
23
24
25
26
27
28
29
30
31
32<dependencies>
<dependency>
<groupId>mysql</groupId>
<artifactId>mysql-connector-java</artifactId>
<version>8.0.28</version>
</dependency>
<dependency>
<groupId>org.mybatis</groupId>
<artifactId>mybatis</artifactId>
<version>3.5.13</version>
</dependency>
<dependency>
<groupId>org.mybatis</groupId>
<artifactId>mybatis-spring</artifactId>
<version>3.0.2</version>
</dependency>
<dependency>
<groupId>org.aspectj</groupId>
<artifactId>aspectjweaver</artifactId>
<version>1.9.4</version>
</dependency>
<dependency>
<groupId>org.springframework</groupId>
<artifactId>spring-webmvc</artifactId>
<version>6.0.11</version>
</dependency>
<dependency>
<groupId>org.springframework</groupId>
<artifactId>spring-jdbc</artifactId>
<version>5.3.23</version>
</dependency>
</dependencies>编写实体类
1
2
3
4
5
6
7
8
9
10
11
12
13
14
15
16
17
18
19
20
21
22
23
24
25
26
27
28
29
30
31
32
33
34
35
36
37
38public class Course {
private String t_id;
private String course_name;
private Integer c_id;
@Override
public String toString() {
return "Course{" +
"t_id='" + t_id + '\'' +
", course_name='" + course_name + '\'' +
", c_id=" + c_id +
'}';
}
public String getT_id() {
return t_id;
}
public void setT_id(String t_id) {
this.t_id = t_id;
}
public String getCourse_name() {
return course_name;
}
public void setCourse_name(String course_name) {
this.course_name = course_name;
}
public Integer getC_id() {
return c_id;
}
public void setC_id(Integer c_id) {
this.c_id = c_id;
}
}编写Mapper接口
1
2
3public interface CourseMapper {
public List<Course> queryAllCourses();
}编写Mapper对应sql语句的xml配置
1
2
3
4
5
6
7
8
9<?xml version="1.0" encoding="UTF-8" ?>
<!DOCTYPE mapper
PUBLIC "-//mybatis.org//DTD Config 3.0//EN"
"http://mybatis.org/dtd/mybatis-3-mapper.dtd">
<mapper namespace="mapper.CourseMapper">
<select id="queryAllCourses" resultType="Course">
select * from spring_course
</select>
</mapper>实现Mapper接口的同时继承SqlSessionDaoSupport
1
2
3
4
5
6public class CourseMapperImpl extends SqlSessionDaoSupport implements CourseMapper {
@Override
public List<Course> queryAllCourses() {
return getSqlSession().getMapper(CourseMapper.class).queryAllCourses();
}
}编写mybatis以及spring-dao配置文件,数据源、SqlSessionFactory
1
2
3
4
5
6
7
8
9
10
11# mybatis 配置文件
<?xml version="1.0" encoding="UTF-8" ?>
<!DOCTYPE configuration
PUBLIC "-//mybatis.org//DTD Config 3.0//EN"
"http://mybatis.org/dtd/mybatis-3-config.dtd">
<configuration>
<!--以包取别名,默认别名是小写类类名-->
<typeAliases>
<package name="pojo"/>
</typeAliases>
</configuration>1
2
3
4
5
6
7
8
9
10
11
12
13
14
15
16
17
18
19
20
21# spring-dao 配置文件
<?xml version="1.0" encoding="UTF-8"?>
<beans xmlns="http://www.springframework.org/schema/beans"
xmlns:xsi="http://www.w3.org/2001/XMLSchema-instance"
xsi:schemaLocation="http://www.springframework.org/schema/beans http://www.springframework.org/schema/beans/spring-beans.xsd">
<bean id="dataSource" class="org.springframework.jdbc.datasource.DriverManagerDataSource">
<property name="driverClassName" value="com.mysql.cj.jdbc.Driver"/>
<property name="username" value="root"/>
<property name="password" value="pwofmysql"/>
<property name="url" value="jdbc:mysql://localhost:3306/spring_study?useSSL=false" />
</bean>
<bean id="sqlSessionFactory" class="org.mybatis.spring.SqlSessionFactoryBean">
<property name="dataSource" ref="dataSource"/>
<property name="configLocation" value="classpath:mybatis-config.xml"/>
<property name="mapperLocations" value="classpath:mapper/*.xml"/>
</bean>
<bean id="courseMapper" class="mapper.CourseMapperImpl">
<property name="sqlSessionFactory" ref="sqlSessionFactory"/>
</bean>
</beans>pom文件加上扫描xml路径
1
2
3
4
5
6
7
8
9
10
11
12
13
14
15
16
17
18
19<build>
<resources>
<resource>
<directory>src/main/java</directory>
<includes>
<include>**/*.xml</include>
</includes>
<filtering>false</filtering>
</resource>
<!-- 如果加了上面的之后连配置文件都找不到了,就配置下面的 -->
<resource>
<directory>src/main/resources</directory>
<includes>
<include>*</include>
</includes>
<filtering>false</filtering>
</resource>
</resources>
</build>测试类
1
2
3
4
5
6@Test
public void test01() {
ApplicationContext context = new ClassPathXmlApplicationContext("spring-dao.xml");
CourseMapper courseMapper = context.getBean("courseMapper", CourseMapper.class);
System.out.println(courseMapper.queryAllCourses());
}
Spring声明式事务
回顾事务
为什么需要事务?
- 原子性、一致性、持久性、隔离性
- 要么都完成,要么都不完成
声明式事务结合AOP实现
整合mybatis的基础上
创建事务bean,传入数据源bean
1
2
3<bean id="transactionManager" class="org.springframework.jdbc.datasource.DataSourceTransactionManager">
<property name="dataSource" ref="dataSource"/>
</bean>配置事务通知
关于事务的传播,可以参考 7种事务的传播机制_青鱼入云的博客-CSDN博客:
- REQUIRED(默认):支持使用当前事务,如果当前事务不存在,创建一个新事务。
- SUPPORTS:支持使用当前事务,如果当前事务不存在,则不使用事务。
- MANDATORY:中文翻译为强制,支持使用当前事务,如果当前事务不存在,则抛出Exception。
- REQUIRES_NEW:创建一个新事务,如果当前事务存在,把当前事务挂起。
- NOT_SUPPORTED:无事务执行,如果当前事务存在,把当前事务挂起。
- NEVER:无事务执行,如果当前有事务则抛出Exception。
- NESTED:嵌套事务,如果当前事务存在,那么在嵌套的事务中执行。如果当前事务不存在,则表现跟REQUIRED一样。
1
2
3
4
5
6
7
8<tx:advice id="txAdvice" transaction-manager="transactionManager">
<tx:attributes>
<tx:method name="addUser" propagation="REQUIRED"/>
<tx:method name="deleteUser" propagation="REQUIRED"/>
<tx:method name="modifyUser" propagation="REQUIRED"/>
<tx:method name="queryUser" read-only="true"/>
</tx:attributes>
</tx:advice>配置切面以及切入点
1
2
3<aop:config>
<aop:advisor advice-ref="txAdvice" pointcut="execution(* mapper.*.*(..))"/>
</aop:config>测试前,制造错误delete语句与制造前对比
1
2
3
4
5
6@Test
public void test01() {
ApplicationContext context = new ClassPathXmlApplicationContext("ApplicationContext.xml");
UserMapper userMapper = context.getBean("userMapper", UserMapper.class);
System.out.println(userMapper.queryUser());
}